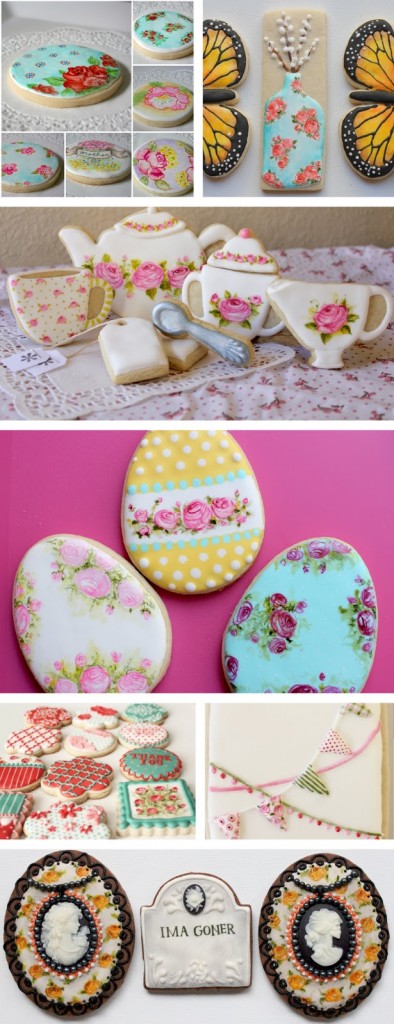
While I was at Cookie Con {YES! I’m talking about Cookie Con again} I showed how to do a couple of painting techniques that progressively got a little more difficult starting with antiquing and using the texture of the flood to add dimension. Then I moved on to painting scribble roses and I thought I’d share here what I taught and how I do it.
It is literally scribbling concentric circles that gradually get bigger and messier as you go around, add a couple of green scribbles for leaves and BAM! they look like roses. As you can see below it is my go-to technique when I want something to look pretty, girly, antique, and I’m in the mood to scribble… which is always.
Video stats:
- I used a regular detail 5/0 liner brush for the first step and an extra long liner brush for the second step.
- Start with the lightest color {light pink} and then do the same thing with a darker color {maroon}.
- For the color: this is Wilton brand food coloring and the liquid in the cup is water.
- Start with a tight circle and then basically spiral out of control.
- Leave some white, it will serve as highlighting on your petals.
- Don’t be scared. It might take some practice, but don’t stress. Just scribble!
You can find more about my brother and his original Graffiti Jamboree music HERE!
Now… get in touch with your inner-preschooler and get scribbling!

What a great tutorial. Vicki and I were just talking about how to do this the other day…now we know!
This is just beautiful, such gorgeous cookies, thanks for the tutorial, you make everything witch such and ease.
Thank you!!!!! I appreciate the tutorial – my first project though is a cradle for my granddaughter's baby doll. Now to find a tutorial on ribbons, so I can incorporate the sweet roses you do on the project. I am so impressed by all of your work. Thank you for sharing.
I'm dying (haha) to know how you did the cameo on the Ima Goner cookies! And thanks for the tutorial.
Go on etsy.com and do a search for silicone moulds. Hundreds of beautiful food grade moulds will show up. I just melt my color choice of candy melting disks with a bit of shortening and paint that into the little crevices using a paintbrush to prevent any bubbles, put it in the fridge for a minute and they pop right out. It is a great, easy way to add fun details. For the cameos I used a two step process to the painting the candy and chilling layers. Have fun!
Thank you! I've practiced a few times since CookieCon. I love doing these roses!
Thank you Liz! Love the music too!
Stunning! Thanks for the video – can't wait to give it a go!
What a talented brother you have! Great song in the background! You make the roses look so easy – thanks for sharing.
What a talented family! I love watching you paint and your brother's song was great. Thanks for the tutorial!!
whaw…I would say…that's it?!? yeah, but I have to try!!!! You make things look so easy…but I am very tempted to try this teqnique 🙂 thanks for your video
So beautiful… but HOW DID YOU MAKE THOSE CAMEOS??! I'm talking about the white on black cameos next to the "Ima Goner" cookie. They're amazing!
Go on etsy.com and do a search for silicone moulds. Hundreds of beautiful food grade moulds will show up. I just melt my color choice of candy melting disks with a bit of shortening and paint that into the little crevices using a paintbrush to prevent any bubbles, put it in the fridge for a minute and they pop right out. It is a great, easy way to add fun details. For the cameos I used a two step process to the painting the candy and chilling layers. Have fun!
Marvelous, it seems so easy in your hands!
This is really beautiful. I´ll give it a try next week.
Thank you so much for sharing it.
Greetings from Tenerife/ Spain
Nicole
I really love your work. This was a great tutorial and just maybe one day, I'll try to decorate a cookie or two as beautifully as you do. Thanks for the video.
P.S. Your brother's music is wonderful!
You are awesome and you make me happy!! 🙂
You make it look so easy! So beautiful – thanks for sharing your technique!
Wow, those are amazing! I love these cookies, such cute roses!! Thanks for sharing this technique 😀
Beautiful, thanks for sharing!!
Thank you for having such a sharing spirit and for doing this! I almost fainted when I saw my mom's cookies included in your collection above. Oddly, I feel famous for having eaten one. (They were AMAZINGLY delicious and so beautiful in person I wanted to weep.) I hold you in the highest esteem for so very many reasons!
Amazing!..thank you for sharing..I am always in awe of your beautiful work 🙂
Thank you, thank you, thank you. Can't wait to try them. We don't get Wilton colour here (South Africa), we only have one brand which is Cake Flora. it is a gel colour, hope it's going to work.
Your brother's music is great.
Desde Málaga(España), muchas gracias por tan brillante tutorial. 🙂
WOW! I just love your blog and all that you post. I am in awe of your work. Just AMAZING. Did you use a stencil on the flower shaped cookies? If yes, might I ask what they are called and where they are sold? thank you so much. I am going to have to buy some brushes and try this out. Hudi
Are you asking about the red and green ones above? That is not a stencil, but the pattern is called quatrefoil. I'm not sure if there is a stencil? On that one, to get the precise lines and symmetry I used a projected {Kopykake} image I found of a quatrefoil design I liked and piped it.
I'd love to see your scribble roses when you try them out!
You just blow me away! I guess that I should'nt be surprised. I would love to show you the photos once I'm done. Is there an email address?
Just tried your scribble roses for the first time last night. They weren't perfect (or should I say they weren't up to Arty McGoo standard) but I can see I'll get there. Thank you so much for sharing!
Can't wait to try this!! Love this tutorial.
What kind of frosting do you use? I've tried to spray food color through lace to make a pattern on cookies, but the frosting absorbed and disbursed it, so no clear pattern emerged.
i will try this one
Fantastic!
Genius!!! Cannot stop watching your videos!
I am obsessed with these! Thanks for posting a video. Can't wait to give them a try.
We tried your technique the other day – my oldest daughter and I! Wow, we felt like artists! Thanks. Met you at Cookie Con in 2014. So fun to find this tutorial from someone I have met!